
For months I’ve been coveting a turntable cake plate, for ease of decorating. Not that I’m the world’s best cake-decorator, but just the idea of putting the cake on the plate part and being able to turn it with the flick of a wrist, instead of maneuvering around and trying to reach the back of the cake without smooshing the already-smoothed front… Well, I feel like I’d be a better cake-decorator if I had the proper tools. I’ve got the offset spatulas and they sure do help, but a turntable is just so, so…professional.
It surprised me how challenging it was to find the right one. I looked in the Chef’s Catalog, Williams-Sonoma, Bed Bath & Beyond, even professional baking-supply stores in NYC. No dice. I had two real criteria:
- Practicality: this seems obvious, but it had to have an actual turntable. I saw loads of attractive pedestal cake plates that, stupidly, didn’t turn for decorating.
- Style: on the other hand, there were lots of turntables made of ugly white plastic or some other back-of-the-house material. I didn’t want to spend all that time icing the perfect cake, only to risk messing it up by moving it to a suitably presentable platter, you know?
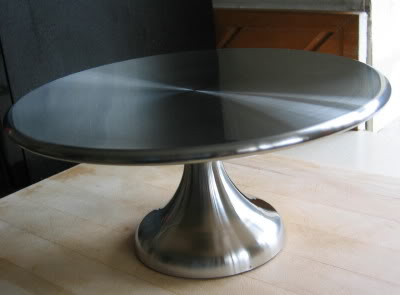
And then, last week it happened. I was cruising around the Crate & Barrel outlet site, taking a peek for some early holiday shopping, when I saw this. It’s gorgeous, no? And half-price! The only thing it doesn’t have is a cover, but the lid from my Rubbermaid cake container fits exactly. I ordered it, and it just came! Isn’t it gorgeous?
I do have a problem, though–I’ve gained so much weight recently that after yesterday’s IMBB I swore off baking for a while. So here I am with this work of art just begging to lose its cake-bearing virginity, and I’ve tied my own hands. Well, my birthday’s coming in late December, so if I don’t feel too silly baking my own cake maybe that’ll give me an excuse. Here’s my favorite birthday cake recipe, which I found on Better Baking’s web site a long time ago and (of course) modified slightly. It’s moist and chocolatey and exactly what I picture when I think “birthday cake”:
Killer Chocolate Layer Cake
Cake:
1 cup sugar
1 cup Splenda (or a second cup of sugar)
1 cup unsalted butter, melted
1/4 cup vegetable oil
6 large egg whites
2 t. pure vanilla
2-1/2 cups all-purpose flour
1/2 t. salt
1-1/2 t. baking soda
1-1/2 t. baking powder
1/8 t. cinnamon
1 cup dutch cocoa, measured then sifted
1-1/2 cups warm, flat cola (or substitute warm mild coffee)
Icing:
1/2 cup chocolate chips, melted and cooled
2 T. shortening
3/4 cup unsalted butter
1 t. pure vanilla
3/4 cups dutch cocoa, measured then sifted
1/2 t. cinnamon
1-3/4 cups confectioner’s sugar, measured then sifted
1/2 cup water, cola, or 1% milk
Preheat oven to 350 and set rack in center. Lightly grease 2 9-inch layer pans and line them with parchment paper circles.
In a large bowl, blend sugar, butter, and oil by hand. Add eggs, and vanilla. In a separate bowl, stir together flour, salt, baking soda, baking powder, cinnamon, and cocoa. Fold dry ingredients into wet and mix, drizzling in cola as mixture blends. This is a thin batter.
Divide batter between cake pans and place on middle rack. Bake for 35-40 minutes, rearranging after 20 minutes. When done, cakes will spring back when lightly touched. Cool in pans on rack for a few minutes, then turn out onto rack to cool completely before icing.
Make the icing: Using a hand-held or stand mixer, cream melted chocolate, shortening, butter, and vanilla with cocoa, cinnamon, and 1 cup of confectioner’s sugar. Add remaining confectioner’s sugar and whip on high speed, adding a bit of your chosen liquid to get a light, fluffy consistency. If not using right away, re-whip before using. Add additional warm liquid a tablespoon at a time to get correct consistency.
Decorating: Put a dollop of icing on the cake plate to keep the cake from sliding. Place first layer on top. Ice the top with about 1/2 inch of frosting. Place second layer. Brush off crumbs from top and sides, and apply a thin layer of icing all around to “set” the cake. Let that dry for 5-10 minutes, then apply a thicker, more lavish layer all around–sides first, then the top.
An idea I’ve been dying to try with this recipe is to slice each layer in half horizontally with dental floss, and put seedless raspberry jam between those “extra” layers. Would make a more elegant cake, I think. Not that there’s anything wrong with the casual chocolatey richness of the basic recipe…