

Since becoming a mom, I’ve learned so many things: How to change a diaper on a squirmy, slippery infant. How to change a diaper on a standing-up (or running-away) toddler. How to persuade a preschooler to share the 1000 stickers he’s hoarding. Seriously important stuff, but for the most part I don’t write about it here.
For you, I save the really important stuff. Like how to use fondant, if you’re an absolute beginner. And today, how to make and use royal icing.
Even if you’ve never heard the term before, I can almost guarantee you’ve eaten royal icing. It’s the hard stuff used to decorate cookies (check out Eleni’s amazing creations) and make edible flowers for cakes. And—shock of shocks—it turns out to be relatively easy to work with. Certainly easier than no-fundant.
But I didn’t know that before I volunteered to bake cookies for Harry’s school Halloween party today, so in a mild state of what-have-I-done panic, I turned to my expert friend, Sara Schneider of Sara Bakes Cakes. And she kindly, as she so often does, talked me off the ledge.
For cookies where you’ll be filling in a large space (called “flooding”) but still want precise edges, you need two consistencies, which are prepared in reverse order of how you’ll ultimately use them. First, make the entire batch fairly runny, so that when you fill the interior it’ll ooze/spread by itself to cover the space. Then pull out a small quantity and add more powdered sugar, until it’s thick enough to pipe. This is what you’ll use to outline the cookie—which you’ll do before you flood the interior.
Honestly, with these cookies (Whole Wheat Sugar Cookies, by the way) I found it easier to make the icing all one consistency, thicker than runny but thinner than pipe-able. I mixed my colors in separate bowls, then transferred each to a small zipper-lock bag and sealed it. Snipped off a teeny bit of one corner, and I was good to go. Were I aiming for Eleni-levels of detail, I’d have not only made two consistencies, but also used decorating tips for more control.

Some tips for the actual icing and decorating:
- Before you begin, line a rimmed baking sheet with foil and set a cooling rack inside it, then put the cookies to be decorated in a single layer on top. This will make cleanup much easier, trust me.
- Have all your decorations lined up at your workspace—once you start applying the icing, you’ll want to move quickly before it begins to set.
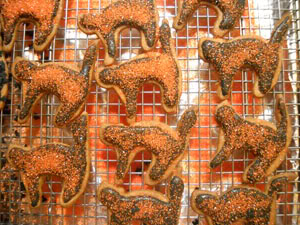
- If you’re decorating a relatively large batch of cookies, don’t do all the icing at once; the first cookies will begin to set before you get to the decorations. I did about ten at a time, icing then sugaring, then icing and sugaring ten more, and so on.
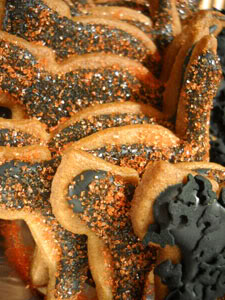
- Be generous when sprinkling on the sanding sugar. Seriously, use way more than you think you need. Once the icing is firm, you’ll shake off the excess and leave behind a nice, even layer of sparkle.
- If you’re using two colors on one cookie (like with the pumpkins), ice the smallest section first and add that section’s decorations. Allow it to set, then shake off the excess and move on to the next color. Repeat this process separately for each color.
- Always let the decorations set for at least 20 minutes before shaking, and a few hours before stacking.
Royal Icing
Recipe from Sara Schneider
Makes enough for a recipe’s worth of sugar cookies, with plenty to spare, and halves easily
1/4 cup meringue powder
1/2 cup water
4 cups sifted confectioners sugar
A teeny bit of lemon juice, optional
- Beat the meringue powder and water in a mixing bowl until you get foamy peaks.
- Add the powdered sugar (hold back about 1/2 cup, so you’ll have control over the thickness) and beat until it’s light and very white.
- If you’ll be piping and flooding, make the runnier flooding-consistency first, then pull off a smaller amount and add more sugar until it’s thick enough to pipe.
- Divide into separate bowls for each color, mix, and go.